
Some links included here may be affiliate links, meaning we may earn a small monetary bonus from referring you to them. In no way does this increase the price you pay.
Keeping yourself and your business or side hustle organized is going to help you stay focused so you can grow faster and in a more sustainable way.
One of the easiest ways I’ve found to start doing this is to organize the areas you use most – in this case, it is your email inbox.
Organizing Your Gmail Account
People spend an average of 9 hours a day checking email (not a real stat).
But seriously, how many times a day do you catch yourself in your inbox just getting caught up on other people’s agenda?
I was wasting sooo much time in my inbox, and I still do sometimes. But I’ve found some ways to minimize this as best I can.
Note: Even if you’re not using Gmail, you will still find some of these tips helpful.
Use Gmail Labels
These are lifesavers for me. I have Gmail labels for each client (and past client) I have, each project I’m working on, one for personal stuff, one for other work stuff, etc.
Actually, I just counted: 136 labels total.
You don’t need that many to get started though.
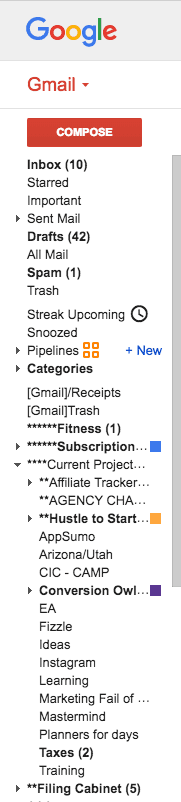
Here are some of the main ones I currently have:
- Current Projects – overall label for everything I’m working on
- Hustle to Startup – this has many subfolders of projects I am or are going to be working on
- Conversion Owl Marketing – my marketing company, this includes sub-labels for each client and projects I’m working on there as well
- Filing Cabinet – this is where all my receipts and personal stuff go
- Business Ideas – future ideas I have that I want to keep somewhere
- Blog Post Ideas – these are scattered in many places, but this is one of them
- Family – emails with family members, receipts of my dogs’ vaccinations, etc.
- Past Projects – things I’ve stopped working on but want to look back at in the future
These essentially act as folders that live on the left-hand side of my inbox. I can easily drag them where they need to go when I’m done with them or will revisit them at a later date.
I like to keep a lot of old emails because you really never know when you’ll need them again. This has helped me find old conversations I want to revisit and save important receipts I might need in the future.
Instead of just having everything in your inbox, separate them out so you know what needs working on and what can be filed away and never (or rarely) thought of again.
This is a great idea especially when you’re working with clients because you can show proof of conversations and communications you’ve had in the past if they ever came back and disputed some of your work.
And even more important, if you ever wanted to build a case study about the work you did for them, it helps with time stamps and finding old reports at a moments notice.
Use Gmail Filters

Gmail filters are awesome! You can think of it like Gmail automation, or at the very least, Gmail automatic sorting.
Gmail filters allow you to set up categories that essentially tag your emails with different labels, or even move them to that labels folder, within your email account.
Yes, new filters essentially create a folder for you to store your emails in for future reference.
How to Set up Gmail Filters
Here are the steps to set up a Gmail filter:
1. Navigate to the email you want to filter out in the future.
For this example, I’m going to be filtering email notifications I receive when people optin for my free course on freelancing (see the top of the page to grab this) I want these to go into a specific “label” – which is similar to a folder in Gmail.
2. Click on the “More” button and select “Filter messages like this”
3. The default will come up as filtering messages from that person/email address, but I like to add in subject lines so it doesn’t send ALL emails that ever come from this address to the filter we are setting up.
You can also filter by which email these are being sent to, if the email contains certain words, has a large attachment, etc.
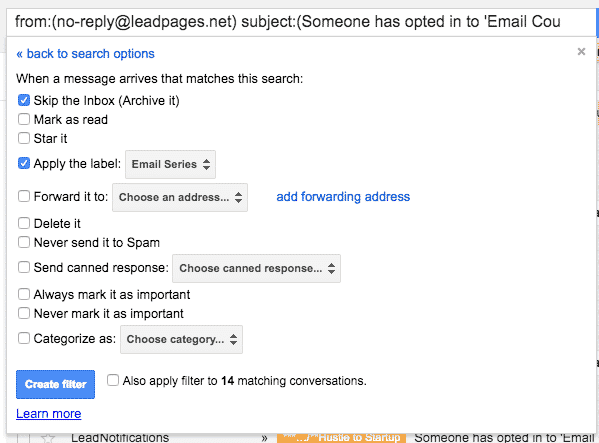
4. Once you are done filling this out, click “create filter with this search” and you will be brought to a screen where you tell Gmail what to do with these emails
5. From this screen you can:
- Skip the Inbox (Archive it) – if you want it to go right to that labels “folder”
- Mark as read – I usually leave this unchecked
- Star it
- Apply a label – this is the one I use most
- Forward it to another email address
- Delete it – if someone keeps spamming you, or you want to block your Ex 😉
- Never send it to Spam – if something keeps ending up in the spam folder
- Send canned response – can be super helpful, but I’m hesitant to blindly send out emails that contain certain words because you probably aren’t addressing all of the persons concerns. Might be good if you offer a free e-book or other offer if they send proof of purchase.
- Always mark it as important – can be useful
- Never mark it as important – also, depending on how your inbox is set up, this could be useful.
- Categorize it as personal, social, promotions, updates or forums – this is helpful if you use the tabs Gmail setup a while back to try and streamline your email experience.
For this example, I choose Skip the inbox and Apply a label. The label can be setup ahead of time, but doesn’t have to be. Here is what this will look like:
6. Click “Also apply filter to matching conversations” and it will move all the past emails with those same criteria to that label. You don’t have to check this box if you want to manually apply rules to ones you’ve already received, but this can be helpful if you have a lot of emails you’re wanting to tag in some way.
My Most Used Gmail Filters Examples
1. Get LeadPages Optins Out of Inbox
This is the main one I use, and have about 15-20 variations of it built out.
I set up landing pages for many of my clients – and to do that I use Leadpages. Leadpages can send out email notifications when people optin to the page you’ve built, which is awesome…at first. This allows you to see how many people are opting into your Leadboxes and give you a sense of the frequency since each email is timestamped.
After a while, especially if you start gaining traction with a campaign, it can start clogging up your inbox. Sure, you can turn off these notifications, but I like to keep them going for a bit to make sure everything is working well.
But I also don’t want my inbox looking like this:

Using filters, I can tell Gmail to automatically sort these into their respective folders AND I don’t even have to see them in my inbox. Here’s how to set this one up:
1. Navigate to the lead notification email you want to filter out
2. Click more > Filter messages like this
3. If you’re sorting by subject line, enter the subject line you want to filter by
4. On the next screen you’ll want to choose “Skip the inbox” (if you want it to be put in the label’s folder without you seeing it first) and Label as “Client name” or “optin name” or “Business Name” – whatever “folder” you want it to be put into.
5. Check the box to apply this to all matching conversations (if that’s what you want)
2. Keeping Client Emails Organized
I set this one up to tag emails from my clients, their employees, or even emails they send out to their blog subscribers/readers.
It doesn’t actually move them to the filters folder but will tag them.
Let’s say my client was ABC Financial – every time the point of contact at their company emailed me, I could tag those emails as “ABC Financial” and I could see it as soon as a I logged into my inbox.
3. Tagging HARO Emails as Important
Help A Reporter Out (HARO) is a great tool for getting your brand into the news. Essentially reporters put out a summary of the story they are going to write, and what kind of people they want to get information from or feature in these stories. You would then reply to the ones that fit your business or lifestyle and you could potentially get into the news.
HARO sends out 3 sets of emails each day, and depending on how many of the lists you’re subscribed to, this could be 21 emails a day (for me it’s 12).
Even so, that’s a lot of mail to go through each day for the small chance of even finding a story to submit your information to, let alone get featured on.
I set up a tag in Gmail that checks any email from Help A Reporter Out, and looks for keywords like marketing, side hustles, etc. so I only need to check those emails – not go through all 12 each day.
It’s not perfect by any means, but it does filter out some work for me.
Here’s how to set up it up:
1. Navigate to a HARO email you’ve received lately
2. Click more > Filter messages like this
3. In the “Has the words” section, enter in the keywords you want it to look for separated by “OR”. For instance, if I’m looking for the words freelancing and side hustles, I’d write it like this:
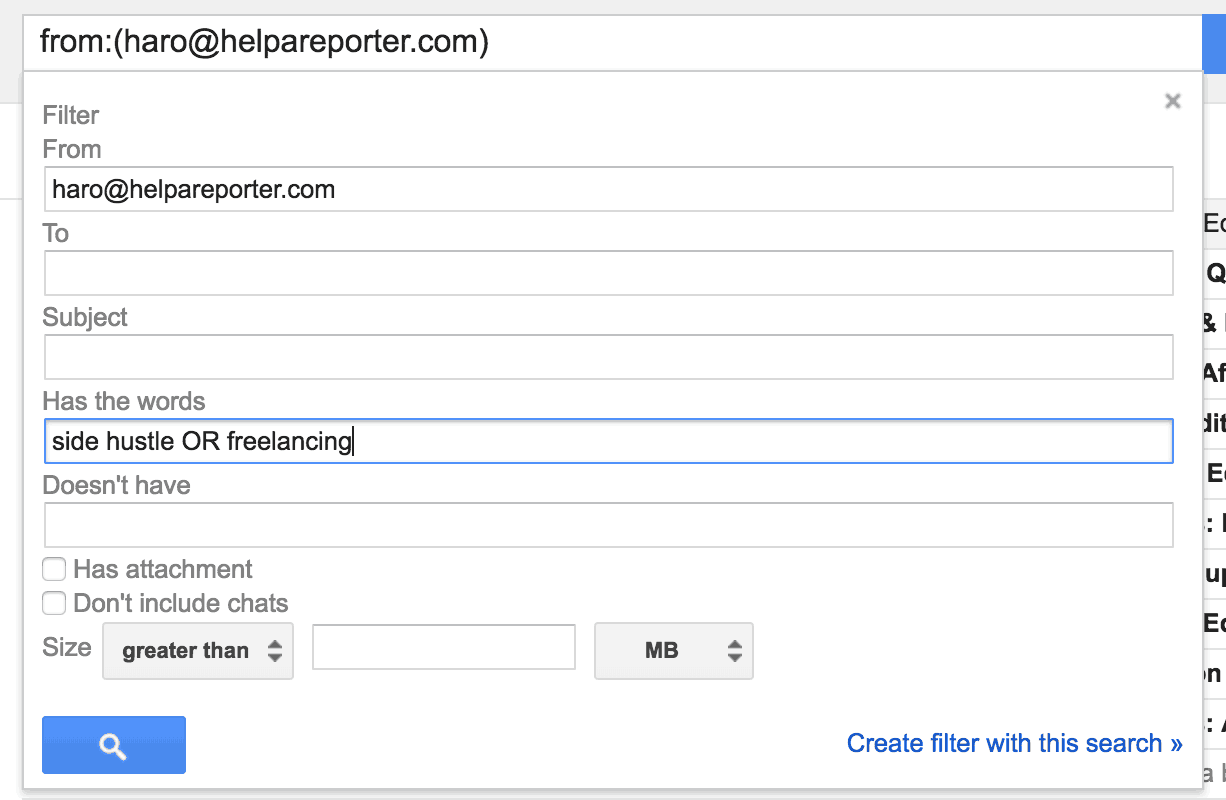
You can add as many keywords as you’d like, just make sure they are separated by OR in capital letters.
4. Tagging Email Payments Receipts and setting up IFTTT to text me
Before I started using Wave Accounting and get app notifications when a client pays an invoice, I cobbled together this method of getting notified when I was paid.
If PayPal emailed me “XYZ Client as paid their invoice” I would have it tagged a certain way using Gmail filters. Then I would set it up in IFTTT (If This Then That – it’s an automation service anyone can use for free) to text me every time an email was tagged as “Client Paid.”
It wasn’t the fanciest setup, but it helped me stay on top of when I was getting paid.
Set up a “Subscriptions” Folder
I can’t remember where I learned this little nugget, maybe Tim Ferriss’ podcast or something, but it’s GOLD.
What you do is setup a Gmail label called “Subscriptions”, or whatever you want to name it, and then set up a Gmail filter that automatically moves all of those email subscriptions you’re subscribed to over to that folder.
Here is how I set up my filter:
You find an email with an “unsubscribe” link at the bottom, and click “Create Filter” when that message is selected. Then fill out the filter options like so:

This keeps your inbox much cleaner and allows you to see important emails first – like those from actual people.
With Gmail’s update to include a “Promotions” tab, you might not need to take this step – but I wasn’t a fan so I have those tabs turned off and just use this method.
Use Canned Responses
This one is a Gmail “Labs” program. Under the “Settings” menu, go to “Labs” and then search “Canned Responses.” It should look like this:

Once you find it, click the “Enable” button and it will be turned on.
Now when you go to create an email, click the “more options” button in the bottom right corner of the email and you’ll see Canned responses.

From there you can just create the email you want to save, click to open that menu and hit “save” under the canned responses area.
This is great for client onboarding, or answering questions you get all of the time.
Check Email 2-3 Times a Day
This is one I really struggle with. I’m always in my email, AND it’s the most common way clients contact me. So I can’t just ignore it for long spans of time.
I’m trying to only check my email once in the morning (but not immediately after I wake up), once around 1pm and then once around 5pm.
It’s not as easy as it sounds.
I’ve turned off all phone notifications for email, deleted the native Mail app on my phone and installed a sweet little tool I was recommended by a friend…
Use Spark Email
This tool is golden! It only sends me notifications when specific people email me, i.e. clients. That way if I have something important to respond to, I’m not missing it for 4 hours at a time, but I’m also not getting annoying notifications for every single email I receive.
There is also a desktop/Mac app I have yet to play around with but it looks pretty cool!
Use Streak to Snooze Messages
Streak is something I was using a lot more than I am today. It can essentially be a full CRM for you if you want it to.
I currently use their “Snooze” feature, which is something I haven’t found included with any other app.
Here’s how it works:
You ever get an email that you can’t work on until tomorrow, but you don’t want to forget about it? Or you need to follow up with someone in 3 weeks and don’t want that email lingering in your inbox for that long?
You can use the Snooze option to essentially hide it until a specific time and date.
Yes, the email goes away and then gets put into your inbox as an unread message at the date AND time you pick.
Streak is a Google Chrome extension that adds a few options to your Gmail account – including this awesome Snooze button:

You can use their calendar menu to select a date and time, or use their suggested times such as an hour from now, next Monday, or in one week.

When you’re done Snoozing your email, you will get a confirmation that looks like this:

I use this regularly if I email a potential client and need to follow up in 3 days or so. Streak also allows you to only get the notification if no one has replied to the original email.
I have a forgetful memory so if they don’t email me back, I’m going to forget to do so for more than 3 days – it’s just how it is.
Instead, I set up a snooze notification to essentially bring that message back to the top of my inbox, and voila! No more forgetting to follow up!
Streak literally saves me from myself!
Alright, those are all of the tips and hacks I have right now. I’m hoping some of these save you time and energy in some fashion.
Of course, there are a ton of other tools, but these are the ones I’m most commonly using at the moment.
I’m adding more of these time management related posts here in the coming days, so keep an eye out!
Thanks for the great tips. I will have to start implementing a few of those. I’m spread across three different email client platforms so getting things streamlined as much as possible will make a huge difference.
Glad to hear that! 3 email platforms does sound like a lot! 🙂
What a guide, Chenell!
(btw, you have an interesting story)
Anyway, I came across here while searching for a substitute to Inbox by Google, as the service shuts down in March 2019. Really disappointing:(
Your guide is at least super helpful for the folks which will have to return to Gmail. Have you tried a different tool than Gmail? I am currently using this app for Gmail organization – https://flow-e.com/blog/how-to-organize-gmail-emails/, let me know if have ever tried it (if yes, how do you use it).
Cheers!
Nicole
Thanks so much for this !!! This saved me of my inbox clutter!